
Choosing the right sealing wax for you
Table of Contents
- Introduction
- What Are Wax Beads and Sticks?
- Wax Beads + Spoon + Candle Method
- How it works
- Benefits
- Drawbacks
- Glue Gun Style Wax Sticks
- How it works
- Benefits
- Drawbacks
- When to Choose Each Method
- Conclusion: Which Is Better?
- FAQs
Wax sealing has made a stunning comeback in the world of stationery, weddings, packaging, and art. Whether you’re sealing an envelope or embellishing a handmade invitation, the charm of a wax seal adds a timeless, elegant touch. At Premium Wax Seals, we know because we make wax seals everyday!
But if you’re just starting out, one question inevitably arises:
Should you use wax beads with a spoon and candle or opt for glue gun wax sticks?
Both methods are widely used, and each offers a unique experience depending on your project goals. In this post, we’ll break down how each method works, highlight the pros and cons, and help you choose the right one for your needs.
What Are Wax Beads and Sticks?
Wax Beads

Wax beads are small, uniform pellets made specifically for wax sealing. Typically, you melt 2–4 beads in a metal spoon held over a candle flame until liquefied. Then, you pour the melted wax onto your desired surface and press a stamp into it.
Wax Sticks (Glue Gun Style)

Glue gun wax sticks resemble regular glue sticks but are made of sealing wax. These sticks are designed to be inserted into a low-heat glue gun. When heated, the wax flows out smoothly, allowing you to apply it directly to your envelope or project.
Wax Beads + Spoon + Candle Method

How It Works
This method is as traditional as it gets. You place wax beads into a sealing spoon, hold the spoon over a tea light or alcohol burner, wait for the wax to melt fully, and then pour it onto your paper or item before pressing in your seal.
Benefits
- Authentic experience: There’s something charmingly old-world about melting wax over a flame. It connects you to centuries of tradition.
- Fine control: Because you control the number of beads and pour by hand, it’s easier to get the precise amount you want.
- Color mixing: Want to get creative? You can mix two or more colors to create marbled or gradient effects.
- No equipment required: You don’t need electricity—just a spoon and a candle.
Drawbacks
- Slower process: Melting one spoonful of wax at a time takes patience. This method isn’t ideal if you need to make dozens or hundreds of seals.
- Mess potential: Dripping wax, overheated spoons, or burnt residue can make things messy.
- Temperature control: Wax can get too hot if held too long over the flame, potentially leading to bubbles or discoloration.
Glue Gun Style Wax Sticks
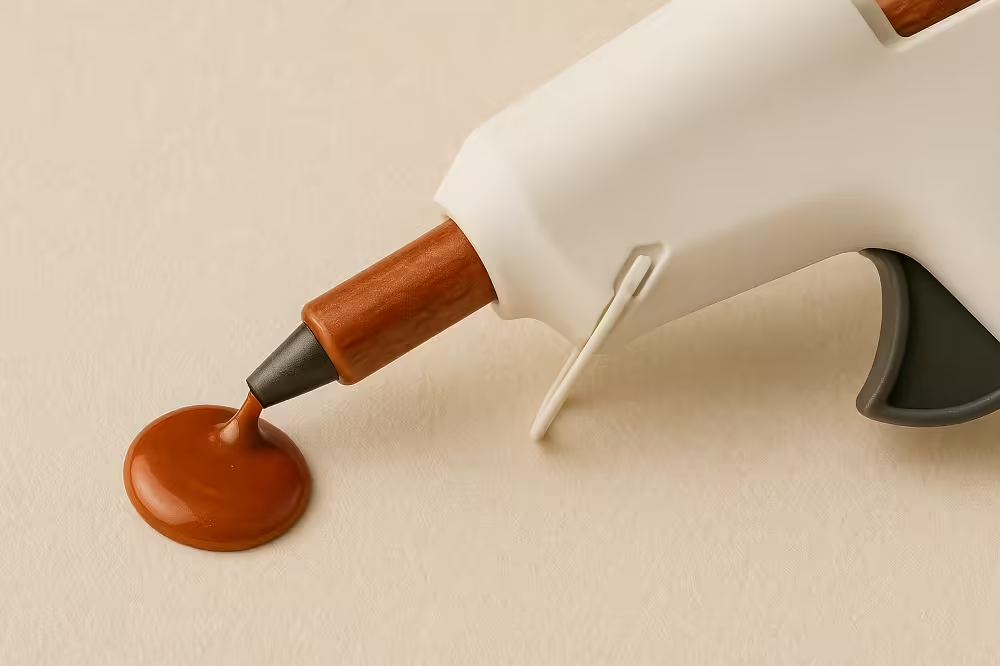
How It Works
Simply insert a glue gun wax stick into a compatible low-temperature glue gun. Wait a few minutes for it to heat up, and then gently squeeze the trigger to apply the wax directly where needed. Immediately press your wax seal stamp into the melted wax.
Benefits
- Fast and efficient: You can easily produce 20–30 seals in a matter of minutes, making it ideal for large batches.
- Cleaner workspace: With no open flame or drippy spoons, it’s a tidier option.
- User-friendly: Even beginners can get the hang of it quickly.
- Consistent results: The flow rate and amount of wax are easier to control, so each seal looks fairly uniform.
Drawbacks
- Less traditional feel: It lacks the charm and ritual of the spoon-and-flame method.
- Requires electricity: You’ll need an outlet and a glue gun, which may limit portability.
- Heat sensitivity: Using a high-heat glue gun instead of a low-temp one may burn or overly liquefy the wax, which can affect the final look.
- Limited color mixing: It’s harder to create mixed or marbled effects compared to spoon-melting beads.
When to Choose Each Method
| Criteria | Beads + Spoon | Glue Gun Wax Sticks |
|---|---|---|
| Volume of seals needed | Low to moderate | High |
| Artistic control | High (color mixing, texture) | Medium (consistent output) |
| Authentic, vintage feel | ✅ Yes | ❌ Less so |
| Setup and cleanup | Moderate effort | Minimal effort |
| Speed | Slower | Much faster |
| Best for | Weddings, art projects, creative envelopes | Bulk mailings, favors, professional use |
Conclusion: Which Is Better?
Ultimately, both methods are excellent—it just depends on your goals. Both methods will allow you to make regular wax seals and even self-adhesive wax seals.
If you’re working on a small, meaningful project—like wedding invitations, love letters, or personal gifts—the beads and spoon method gives you a slower, more immersive experience. You can experiment with colors, enjoy the process, and lean into the romantic, handcrafted vibe.
However, if you’re prepping for a big event or business order, using a glue gun and wax sticks is the clear winner. It’s fast, clean, and efficient—perfect when you need to produce many seals in a short time.
For speed and volume, go with the glue gun. For authenticity and artistry, choose wax beads.
FAQs
Can I use sealing wax beads in a glue gun?
No. Wax beads are not designed for glue guns. They may clog the nozzle or damage the gun.
Do I need a special glue gun for wax sealing?
Yes. Use a low-temperature glue gun designed for sealing wax to avoid overheating. A dual temperature glue gun with the heat setting on low works well.
How many wax seals can I make with one stick or spoonful of beads?
1 wax stick: ~8–10 seals
3 wax beads: ~1 seal
Can I use regular glue sticks instead of wax sticks?
No. Regular glue won’t harden properly or accept a wax stamp.
Can I remelt and reuse sealing wax?
Yes, if the wax isn’t contaminated, you can remelt and reuse it.
Can I make wax seals ahead of time?
Yes! Pour them onto parchment paper or silicone, let them cool, and glue them on later.